TECHNICAL SOLUTION
Name of solutionSolar hot air collector /
solar soda can heater Category of solution
> Solar thermal > Heating |
PDF version to download
Related Energy School
> Renewable energy > Thermodynamics | ||||||
Short introIt is possible to extract and amplify the heat of the Sun and use it to heat some small building, for example a garage, workshop or a shed or perhaps an animal shelter. The solar hot air collector warms the air with sun’s energy and transports warm air into the building with a solar powered fan. |
|
|
Complexity and cost of building and operating
|
Low (full DIY, low maintenance and operating complexity, low cost <100 EUR)
This solution is quite simple and does not require high expertise to build. It is possible to build it from recycled materials. However, if you need to buy all materials, the cost can be 150 euros or so, depending on what you buy and where. When the solution is ready and installed, it does not cost anything to operate it. |
|
Materials, skills and tools requiredSkills
No specific skills required Tools - Materials > aluminum beverage cans (the amount depends on the size of the collector you want to make) > wood or equivalent for the frame > a sheet of glass or for example polycarbonate to cover the frame and the cans > black paint (2 spray cans) > heat resistant glue or equivalent to connect the cans into tubes > screws to build the frame around the cans > woodworking tools (a jigsaw, a drill, a screwdriver, a hole saw) > a can opener and for example a 9” nail, a hammer and a short piece (more or less 50cm) of 50mm plastic pipe, to make holes on the cans > a solar powered fan, or equivalent parts to build one Other preconditions and/or requirementsA woodworking table or other suitable workshop space for building the collector. Appropriate PPE (personal protective equipment) such as ear plugs or muffs when using loud power tools etc. |
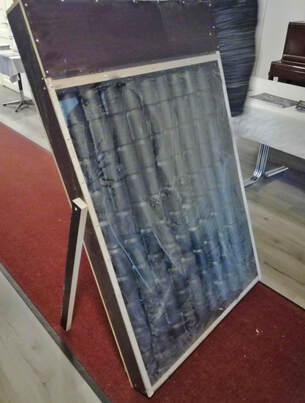
Description of the solutionThe ”solar door” hot air collector is made of aluminum cans connected into tubes and painted black to absorb maximum solar heat radiation. The tubes are placed inside a (ply)wood box frame that is covered with a polycarbonate sheet for weather protection.
When the rays of sun hit the black metal surface, the air inside the tubes warms up. Warm air moves upwards into a manifold box on the top. From the top the air is directed via the hole in the back of the frame to the space that needs heating. There is also a solar panel powered fan on the top of the device, which increase the draw of the warm air into the space that is being heated. When warm air is removed from the heater into the room, new cold air is drawn in from the bottom into the tubes to be warmed. 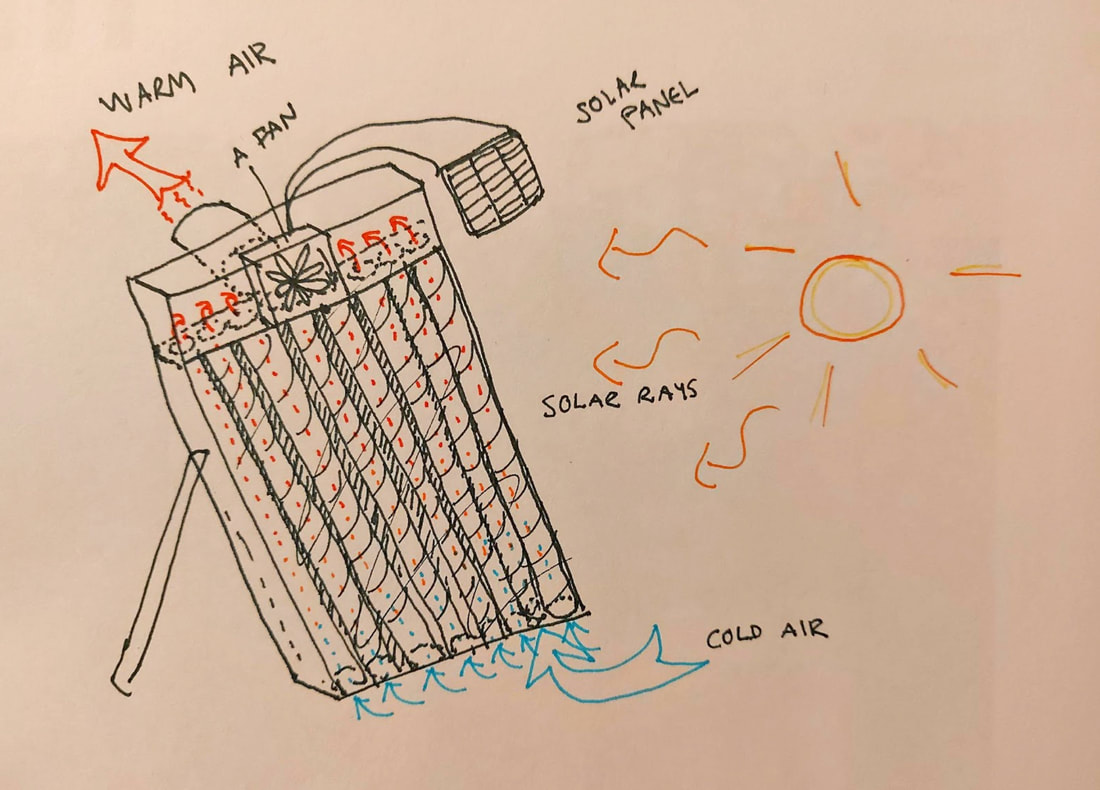
Technical drawing of the solar collector
Results, learnings and errors to avoid
- Life Cycle AnalysisNo analysis has been made
|
|
Step by step guidelines for building the solution
Step 1Make a plan. What is the size of the collector you want to build? The guideline can be the size of the glass/polycarbonate ”window”, availability of wood / plywood, or aluminum cans. For example, if you have a 1 x 1 m sheet of polycarbonate for a window, and a combination of big (0,5l) and small (0,33l) cans, you can make 14 tubes of 7 cans (4 big ones and 3 small ones) and design the collector with these parameters.
Step 2 Collect / aqcuire the materials needed. Step 3 Build the frame for the cans using the materials you have available. The frame consists of the back sheet and the sides (walls) of the frame. Ideal height of the sides is 70mm. The dimensions of the frame are determined by your design. On the bottom side wall make 60mm holes for air intake with a hole saw. Also make a holder for the tops of the tubes. (a piece 70 mm x width of the frame) of plywood with holes to hold the top of each can tube) Measure the box so that it has space for the tubes of cans and an additional bit of space on the top side of the box to collect the warm air. Step 4 Make holes on the cans. The top comes off easily with a can opener. Air flow through the bottom of the can is allowed when you puncture approximately 5 holes into it with a 9” nail and a hammer. A 50mm plastic pipe makes an ideal can holder for the purpose after the top has been removed first. Step 5 Clean the cans, wash them by hand or in a dishwasher. Join the cans into tubes with glue. For this purpose it can be helpful to have a holder / a trough of some sort. Allow the glue to dry. Step 6 Lay the tubes of cans into the frame. Secure the tubes in their place with the holder piece on the top. Paint the tubes with thin layers of black spray paint. 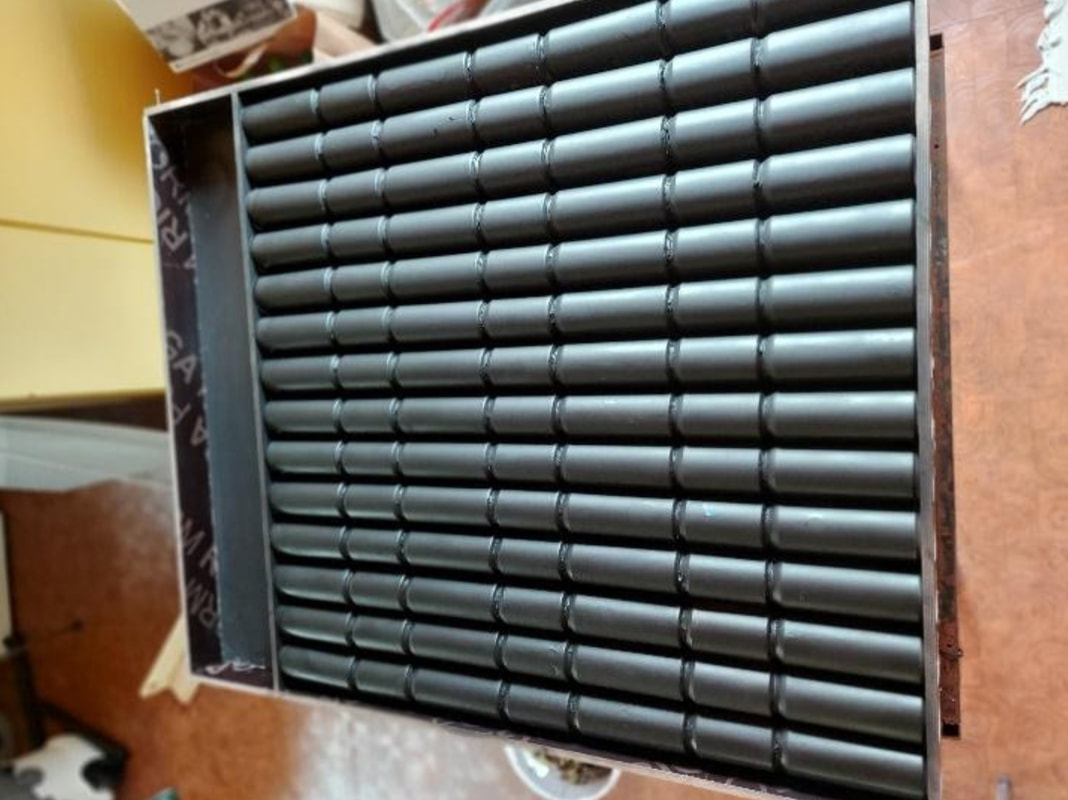
Painted cans in the frame
Step 7
Fix the polycarbonate sheet on top of the frame with screws. Step 8 Install solar powered fan unit into the top part of the frame back, following the installation instructions of the specific product you have chosen. Step 9 Place the heater into window or door facing the sun, so that the air can flow freely in from the holes in the bottom and out towards the room from the top. |
|
Videos |
|
AuthorMari Korhonen
Experts involved-
ContactsProject coordinator Mari Korhonen
mari.korhonen@msl.fi |
|
|
|